Scientific Atlanta 8240HD Betriebsanleitung Seite 1
Stöbern Sie online oder laden Sie Betriebsanleitung nach Digitale Videorecorder (DVR) Scientific Atlanta 8240HD herunter. Scientific Atlanta 8240HD Operating instructions Benutzerhandbuch
- Seite / 28
- Inhaltsverzeichnis
- LESEZEICHEN
- Explorer 1
- Digital Video 1
- Recorder 1
- Notice for CATV Installers 2
- U.S. Patents 2
- Contents 3
- IMPORTANT SAFETY INSTRUCTIONS 4
- continued 5
- Change the Way You Watch TV 7
- Safety First 7
- The Explorer eClub 7
- Identify Your 8240HD 7
- What’s On the Front Panel? 8
- What’s On the Back Panel? 9
- Connecting the 8240HD 10
- Composite 12
- Cable Out 12
- Watch TV 13
- Performance Tips 14
- Picture Formats 16
- HDMI Connector 17
- DVI Connector 18
- Component Input (PrPbY/V) 19
- DVD Player 20
- Back of Home Theater Receiver 20
- (optional) 21
- Hard Disk Drive (optional) 22
- Compliance Information 25
- Index, continued 27
Inhaltsverzeichnis
Connecting theExplorer® 8240HDTMDigital VideoRecorder
Connecting the 8240HDTo connect your 8240HD to your entertainment devices, complete these steps.Identify the additionaldevices you will connectto the
LROUT 25Connections for an HDTV and VCRTo use the 8240HD with an HDTV, you must make one of the following connections to view the HDcontent. In additi
L RAUDIOIN6For VCRs that have a Video and Left and Right Audioconnectors, you can use the Out 2 connectors (Video,Left, and Right) on the 8240HD.8240H
7Watch TVAccess Services and ProgramsAccess cable services and programs by pressing the following keys on the remote control:• Guide–Access the on-scr
8Performance TipsIf the 8240HD does not perform as expected, the following tips may help. If you need furtherassistance, contact your cable service pr
9Frequently Asked Questions About HDTVWhat is Digital Television?Digital television (DTV) is a huge leap forward in television technology compared to
10Picture FormatsA standard-screen HDTV has a 4x3aspect ratio. The screen is 4 units wide forevery 3 units tall.A wide-screen HDTV is one-third wider
11Connecting the 8240HD to an HDTV With anHDMI ConnectorImportant Note Regarding the HDMI Interface on the 8240HDThe HDMI interface will automatically
Connecting the 8240HD to an HDTV With aDVI ConnectorNote: When connecting the HDMI connector to the DVI connector on your HDTV, you need anHDMI-to-DVI
Connecting the 8240HD to an HDTV WithComponent Input (PrPbY/V)WARNING:Electric shock hazard! Unplug all electronic devices before connecting or discon
Notice for CATV InstallersCATV Installers NoticeIf you are a CATV installer, read the information in the box below.U.S. PatentsU.S. Patents ListA pate
Connecting the 8240HD to a Home Theater SystemWith Component Input (PrPbY/V)Note: This connection assumesthat audio is provided by the hometheater spe
Connecting the 8240HD to a Stereo VCR and HDTV(optional)WARNING:Electric shock hazard! Unplugall electronic devices beforeconnecting or disconnectinga
Complete the following steps to install a SATA drive.1. Make sure that both the 8240HD and the external SATA drive are unplugged from power.2. Connect
Connecting the 8240HD to an External SATAHard Disk Drive (optional), continued% Space Used100500InternalHard DriveExternalSATA DriveGolf1:00 pm EST,Sa
Connecting the 8240HD in SD Mode to an SDTVConnecting the 8240HD in HD Mode to an SDTV WithComponent Input (PrPbY/V)WARNING:Electric shock hazard! Unp
Compliance InformationUnited States FCC ComplianceThis equipment has been tested and found to complywith the applicable limits of Part 15 of the FCCRu
Index1394 Firewire 3AACOutlet 3, 16Power input 3Aspect ratio 10BBack panel 3Burn-in of screen 7CCables 9Cable Out 6Com
PPerformance tips 8Picture formats 10Picture-in-picture. See PIPPIP 7Ports. See ConnectorsProduct information. See Web access toproduct in
© 2005 by Scientific-Atlanta, Inc. All rights reserved.Product and service availability subject to change without notice.Scientific-Atlanta, Inc., 503
ContentsImportant Safety Instructions ...ivChange the Way You Watch TV ...
ivHeed WarningsAdhere to all warnings on the product and in the operatinginstructions.Read, Retain, and FollowThese InstructionsRead all of the instru
Checking Product SafetyUpon completion of any service or repairs to this product, theservice technician must perform safety checks to determinethat th
Change the Way You Watch TVDVR makes it easy to watch TV on your terms.The Explorer 8240HD Digital Video Recorder (DVR) is the simple way to take cont
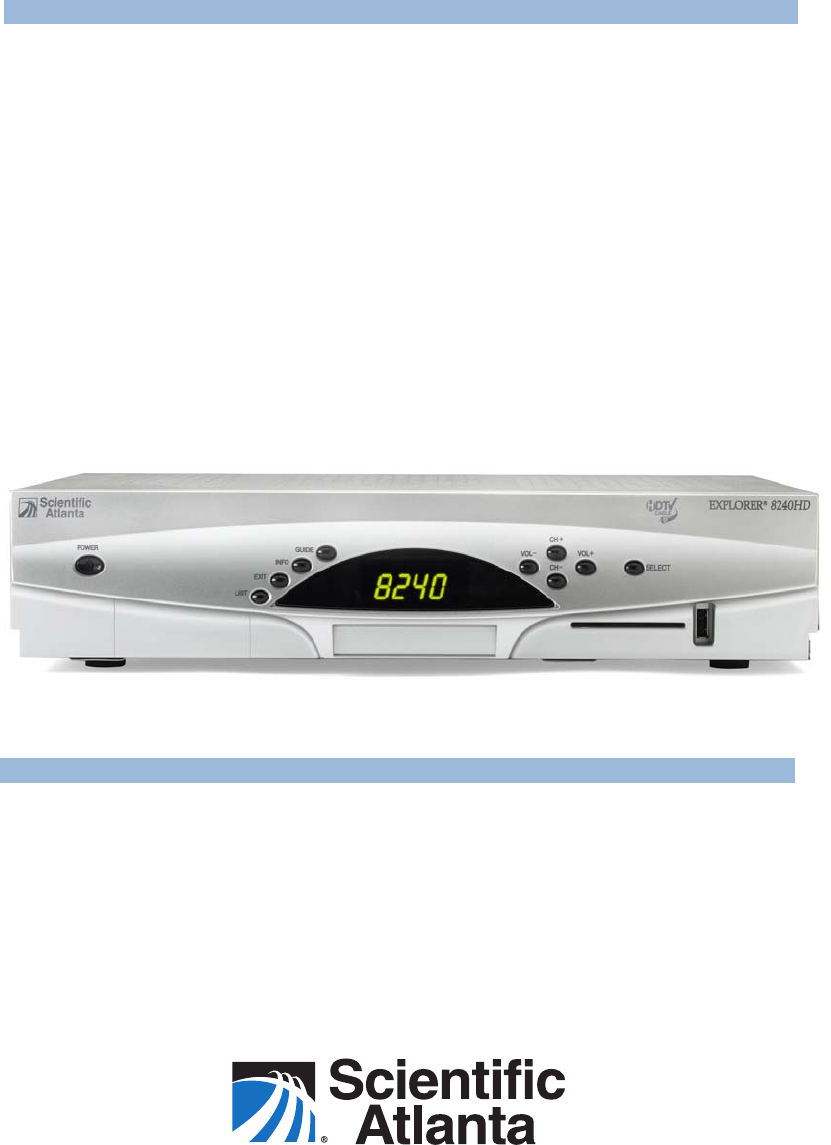
What’s On the Front Panel?21 Power Turns the 8240HD on and off2 List Displays the list of recorded programs3 Exit Exits menus, the on-screen guide, an
What’s On the Back Panel?1 Cable In Connect the coaxial cable that delivers the signal from your cableservice provider2 Cable Out Connect a coaxial ca
Verwandte Produkte und Handbücher für Digitale Videorecorder (DVR) Scientific Atlanta 8240HD
 (24 Seiten)
© 2020, manymanuals.de. Alle Rechte vorbehalten. | 3.536 s |
 Manymanuals.com
 Manymanuals.de
 Manymanuals.fr
 Manymanuals.it
 Manymanuals.pl
 Manymanuals.cz
 Manymanuals.es
 Manymanuals-pt.com
Kommentare zu diesen Handbüchern